AR SKINS
Table of Contents
Before you read
- I strongly recommend reading this documentation on desktop and not on mobile.
- I arranged the development process in a story-like sequence for intelligibility, but it doesn’t accurately reflect the development journey.
- The documentation is aimed at showing my skills and experience, and not at giving a comprehensive insight into the details of this project.
If you have any questions, feel free to contact me! - Have fun reading!
Introduction
Skins
In video games, players select an in-game character and can often choose a skin to customize its appearance. Skins don’t affect the character’s strength but alter their theme through visual effects, animations or sound effects. Players purchasing skins is a way for many games to make profit while offering the game for free.


Jhin, a character from the game League of Legends, with three of his skins.
The characters and art shown above are owned by Riot Games and are part of their game League of Legends, they are used under their ‘Legal Jibber Jabber’ policy.
Riot Games does not endorse this portfolio.
Origin & Concept
Who knows where inspiration truly comes from? But this project is certainly a mix of my fascination with skins, my background in 3D software and an interest in everything wearable, I developed during my studies. I wondered: why not wear skins in real life?
I wanted to create a product, which allowed virtual content to become wearable!
Prototyping & Development
Placement
Right from the beginning, I wanted to focus on only one section of the body. The lower arm struckme as the ideal place for my virtual content. It’s rarely covered by clothing, offers great flexibility for viewing from nearly any angle, which is likely why it’s a popular spot for tattoos.
But how would I get virtual content onto my lower arm?
Vuforia
Vuforia works with game engines like Unity to create augmented reality experiences.
The user defines a target and uploads it to a database for processing.
In Unity, apps that recognize and track the target can be created, also allowing for virtual content to be “attached” to it.
The example uses a book cover as an image target, with an animated figurine placed on top of it. Build into a smartphone app, the figurine appears whenever the app recognizes the cover. Other target options include box-like objects (like packages), cylinder-like objects (like bottles or cans), or even real-world items (like cars or sofas).

A video demonstrating an image target.
I experimented with different target types to find the best fit for my project and settled on cylinder targets as the lower arm’s shape resembles a cylinder or frustum. However, I did not want a random image (like the one used in the example) wrapped around my arm.
So I wondered: What would an image optimized for tracking look like?

An image showcasing a cylinder target.
© Copyright 2011-2022 PTC Inc. All rights reserved.
Tracking Pattern
Not all images are equal, when it comes to tracking. Vuforia rates images for “augmentability”.
The rating depends on the amount of feature points (yellow crosses) an image provides.
More points mean better tracking.
Knowing that feature points result from high contrast and sharp edges, I used Blender’s shader editor to create various textures and tested them for tracking quality. The winner was a voronoi texture with some changes to its scale.
Now it was about finding a way to apply the tracking pattern onto the lower arm…

Vuforia showing feature points and augmentability of an image target


A gallery of various tracking patterns I created

An image showing a voronoi texture with feature points

Several tracking patterns ready to be tested.

A video of me testing a tracking pattern in front of a mirror.
The Sleeve
A Sleeve is an asymmetrical garment covering one arm and is made from elastic and breathable fabric, popular in sports like cycling, basketball or gaming. Screen printing proved the best technique to transfer the tracking pattern onto the Sleeve.


A series of pictures depicting the Sleeve creation process

A video of me testing the first Sleeve prototype in front of a mirror
Initial tests showed my early prototype worked well.
However, things weren’t perfect, as my lower arm (fortunately) isn’t perfectly cylinder-shaped, the software had trouble positioning the virtual content leading to glitches. Additionally, wrinkles and the elastic fabric stretching the pattern negatively affected tracking quality.
Still, I was pleased with the result and aimed to improve the prototype in further experiments.
Reflective Sleeve Pattern
The tracking pattern evolved from a technical necessity into a design element of the Sleeve, but I felt like making it less dominant. This experiment attempted to make the tracking pattern invisible, while maintaining tracking capability.
My idea was to use reflective ink for screen printing, which would make the patterns transparent (the poor man’s invisible) under normal conditions. The app would activate the phone’s flashlight, making the ink reflect the light and the pattern would become visible. So, I got to work…
The image comparison shows three sleeves:
The left one has no print, it’s just a fabric sleeve.
The right one has a pattern printed with reflective ink.
The middle one has a pattern printed with a mix of reflective and black ink.
While the right pattern remains visible under normal conditions, the middle pattern becomes almost invisible for the naked eye, while being fully visible for the camera with flashlight enabled, making this experiment a success!
This improvement had two drawbacks. First, tracking worsened slightly. More critically, the flashlight caused lens flares, high contrasts and poor image quality, hurting the overall visual experience. Since I planned to focus on the virtual content, this trade-off was not worth it. The feature didn’t make it into future prototypes.


Image comparison of three sleeves:
left side without flashlight, right side with flashlight

A video comparing the visibility of an ordinary Sleeve against one with reflective ink.

A video showing the tracking capability of Sleeve pattern printed with reflective ink.
Chroma Key Sleeve
A downside of the prototype was that it only allowed Skins to alter the area surrounding the lower arm and its surface. This was especially frustrating during the design process of Skins, where it proved to be a major limitation in creative freedom. It also leads to unrealistic results, breaking immersion in consequence. The goal of this experiment was to make my arm transparent for objects and effects to appear “within” it.
I realized this by using OBS’s chroma key function to remove anything red from the footage. Then I put on a Sleeve with red fabric on the lower arm. Finally, I added an image layer showing my actual background. The removed red area revealed the background, creating the illusion of transparency.
I was quite happy with the result of this experiment, especially because it worked in real-time. However, the fact that this trick would only work for static scenes made it unfeasible for implementation into Unity, so I left it at this stage and moved on.

A video of me testing the Chroma Key Sleeve in OBS

A picture of me wearing the Chroma Key Sleeve in front of a mirror
Prosthetic
While the Sleeve’s screen-printed tracking pattern was a big step towards my idea of a final product, the inconsistent tracking quality was frustrating during virtual content experiments, making results look messy and unappealing. I needed to balance wearability and tracking quality.
I returned to the cylindrical shape and designed a 3D-printed frustum-shaped prosthetic, which was flexible enough to slip onto the arm and mimicked my lower arm’s shape as closely as possible. The rigid frustum with a paper print-out ensured optimal tracking quality.
It wasn’t the most comfortable, but it allowed me to continue my experiments with virtual content.


A series of pictures showing the 3D-printed prosthetic and the tracking pattern as a paper print-out.
Interface
In a final step, I added an interface to inform users when tracking failed. Using Unity’s visual scripting graph, I accessed the Vuforia API to get information about the tracking status, which another script uses to control the interface’s behaviour.

A screen recording showing the interface working in the app
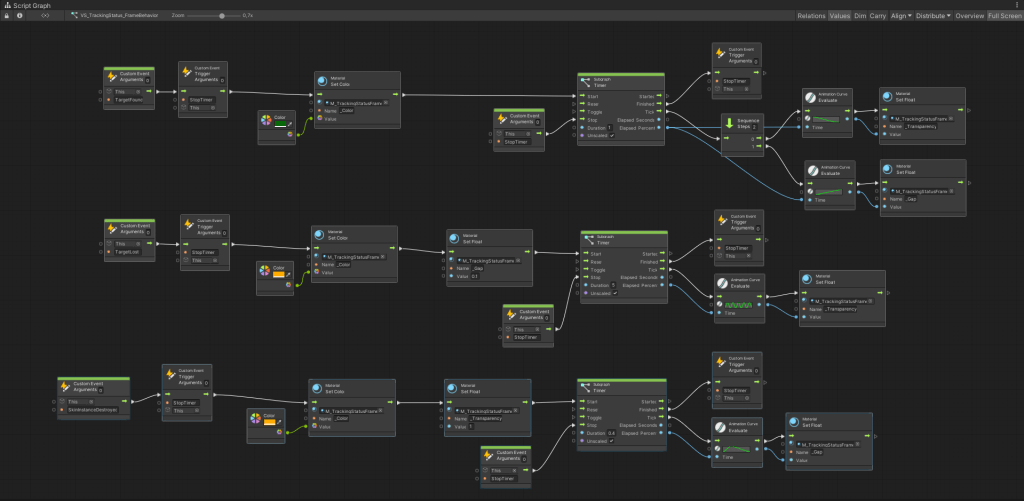
A screenshot of a visual script graph controlling the behavior of the Interface

A screenshot of the script graph accessing the Vuforia API to get information about the tracking status
The Medium: Skins
The medium is the heart of this project and I invested a lot of time learning about it, testing features and trying to build good Skins. I won’t cover every detail of that process, as it’s not central to this documentation and would be too lengthy.
Here are the three key insights I gained:
- Skins are good at communicating transformative concepts.
- Skins are usually composed of an intro followed by a looping section. (Skins relying on lengthy story-telling weren’t effective)
- Skins should relate to or express something about the wearer.
Experimenting with the Medium
The videos below showcase some of my experiments with features I planned to use in future Skins.

tracking

emission

refraction & occlusion

animation

collision

interaction
Characteristics & Capabilities

Visual. Skins are primarily a visual medium and being based on 3D software they allow complete creative freedom.

Wearability is what opens an entirely new room, bringing the potential of 3D software to your own body.

Interaction between two Skins was tested successfully and is useful for partner or marriage Skins.

Sound was something I never experimented with, but the implementation of sound effects or music themes is possible.

Parameters allow users to personalize their Skin by adjusting elements like color, texts, effects, etc.

Triggers make a Skin react to gestures like finger-snapping, touching the ground or touching your sleeve.

Links connect a Skin to the outside world. Like a Skin that changes color with the time of the day, or one that adapts based on steps tracked by your fitness tracker.
Skin: BlueLock Puzzle
The documentation will focus on the technical aspects of the Skin creation process, excluding details about its origin or meaning.
Concept & Inspiration
I tried to base Skins on transformative concepts borrowed from mythology before. However, this Skin uses a more recent source for inspiration, the anime BlueLock. The Skin picks up on a recurring motif of characters breaking apart into puzzle pieces and then reassembling, paired with the concept—To move forward you must rebuild, by tearing down what was there before. The anime’s style and color pallete also inspired the Skin’s design.

A video showcasing the puzzle piece motif


Screenshots of the image textures used for the Skin


A gallery of inspiration used for the Skin
Mesh & Animation
I created the mesh and animation in Blender. The mesh being the frustum wrapped in a repeating puzzle piece pattern. I grouped the pieces into islands, then animated them using physics simulation: first, the pieces explode and scale down, then they return to replace the missing island, scaling up as they go. Each island got this two-step animation—exploding, then reassembling.

A screen recording of the Skin’s mesh being animated in Blender

A screenshot showing the puzzle pieces seperated into island in Blender

A screenshot showing an island being animated in Blender
Scripts & Logic
In Unity, two scripts manage the logic. The first script sets the explosion frequency and randomly selects an island to explode. The second script triggers the island’s animation.

A screenshot of a script chosing a random islands to explode

A screenshot of a script triggering the explosion animation
Shader & Materials
The Skin uses one shader for all materials, including the following features:
- 1 PBR texture
- 2 image textures
- 2 color inputs with blend modes
- UV scrolling
- emission for highlighting puzzle piece edges
- fading opacity for exploded puzzle pieces
- transition to black at the top and bottom, creating a transition to the black sleeve
- the sleeve’s fabric pattern as a background

A screenshot of the shader graph controlling the Skin’s materials

A screen recording showing the funcionality of the Skin’s shader

A rendering showing color variations of the BlueLock Puzzle Skin.
Result

A video of me inspecting the BlueLock Puzzle Skin in front of a mirror using the prototype.

A Video of the BlueLock Puzzle Skin using the Prototype
Visibility
Since Skins remain invisible unless being viewed through a combination of camera and screen, the question of how and under which circumstances that was the case became a big topic of this project. I tested various technologies to explore their impact on perception and every day usability.
Webcam
Using the PC’s webcam was the best way to inspect results during skin development, it allowed me to stay in the Unity editor showing results in seconds and allowed fast iteration loops.

A screen recording showing the development process in Unity using the PC’s webcam
Smartphone
Lucky for me, most people have a combination of camera and screen on them most of the time – Smartphones were the most feasible way to view Skins and became my target device right from the beginning.
Building the app to an Android phone allowed me to wear the prototype in front of a mirror and view it from different angles, increasing immersion.

A video showing the process of building the app to an Android smartphone
AR Glasses
I tried out the Zapbox from Zappar to see how future AR tech like glasses or lenses might impact my idea.
The product is a head-mounted smartphone holder with a lens to widen the camera’s field of view, mimicking human vision.
The glasses blended virtual content with reality much smoother, far better than holding a small screen in my hands. Seeing Skins pop up in my natural field of view as I looked around, created a much more immersive experience. However, there were also significant disadvantages. The lenses distorted my view, leaving me a bit dizzy, and the bright display paired with low resolution caused headaches. Plus, the setup wasn’t exactly a fashion statement.
Overall, I was happy with the experiment, it proved that an advance in technology could tackle my idea’s main hurdle.


A series of images showing Zapbox glasses with a smartphone inserted
Digital Mirror
This method was inspired by public screens known from sport events or concerts. It allows for viewing your Skin hands-free, adding to immersiveness by removing a constraint. The setup was straightforward: a phone mounted to the front of a big screen.

A video of me testing the digital mirror with a skin


A gallery showing the making process of the digital mirror
Use Scenarios
Another way to deal with the topic of visibility was to look for scenarios, where the pre-condition of camera and screen was met already. Social media and broadcasting services offered well-established platforms to make Skins visible.


YouTube

Twitch

Concert
AWE – Augmented Reality World Expo
In October 2024, I attended AWE in Vienna, the world’s largest fair for augmented reality.
My goal was to get feedback on this project, so I brought my prototype and concept videos with me, which sparked mostly positive reactions. Also, I got a look at the current state of tech, like AR-glasses and lenses, realizing that the hardware still has a long way to go until it becomes viable. On day two, I was unexpectedly invited to take part in the XR-Innovators-Showcase, a section of the fair dedicated to creators to demo their prototypes and get in touch with other developers, innovators and investors. Here is where I made a lot of contact with people.
At the end I even managed to pitch to a couple of investors I recognized from a start-up competition earlier, but they showed little interest in the idea, which was a tough note to end AWE on.

A visitor trying out the prototype at AWE

A look around the XR-Innovators-Showcase space


An image series about me visiting AWE
Presentation
I presented my bachelor thesis project publicly on March 31, 2025, at HFK Bremen, alongside other works from my studies. I guided the audience through the development process, material and software experiments, prototype stages, and a vision for the final product. I showcased the skin development journey, from inspiration to conceptualization, realization in Unity, and wearing the resulting skin.
I then discussed the evaluation, highlighting potential target groups, hurdles, and weaknesses. I provided an outlook on the project’s future, exploring how technological advances could shape its implementation as a product. After the presentation, demo stations were set up for attendees to try the prototype themselves.

Montage video of the presentation, special thanks to Leo Brecht for recording and cutting.

Poster for my Bachelor Thesis Presentation
Thank you for reading!